


We have some exciting news to share! J Turner Research conducted an assessment of the 5 best properties for positive online reputation in each state in the nation — and guess who received 4 out of 5 of the top apartments in Louisiana?
Natchez Landing was named the top property for online reputation in the entire state of Louisiana. Brewster Commons, Bella Ridge, and Pelican Bay were close behind.
That’s right, 1st Lake Properties received the humbling distinction of having 4 of the top 5 properties in Louisiana known for their strong reputation. Featured on the Multifamily Executive website, this list goes into great detail about the factors needed to be among the top management companies. Using ORA (Online Reputation Assessment) Power Rankings, researchers assigned a score from 1-100 for all properties in the nation, cross-checking against multiple review sites to create an industry benchmark for a property’s overall good standings.
As a whole, property management companies and individual apartment communities in Louisiana received an average score of 58. However, our 1st Lake Properties featured in this list went well above and beyond the statewide benchmark. Here’s how our top properties stacked up:
There’s never a bad reason to get outside and enjoy the great outdoors, but with Earth Day (April 22) in mind, we’re counting up our favorite outdoor spaces in Metairie and River Ridge. Pack your picnic gear or maybe just a football to toss around — here’s your chance to soak up the sun!
Lafreniere Park — We profiled this sprawling park not long ago, taking note of its picnic areas, landscaped greens, hills, running trails, and so much more. This is one of the best spaces in the heart of the city to enjoy peaceful greenery all around, whether you opt for a jog along the running trail or a birding excursion on the park’s Marsh Island. 3000 Downs Blvd., Metairie
Longue Vue House & Gardens — Though it technically falls under a New Orleans address, Longue Vue House & Gardens is located just off Metairie Road. The landscaped gardens feature fragrant blooms like Confederate jasmine and Mexican primrose, all first landscaped by Ellen Biddle Shipman, a prominent female landscape architect, in the 1930s. The gardens, inspired by the Alhambra in Spain, also feature large fountains and walkways, all anchored by a historic mansion built in the classic Revival architecture style. Tickets are $12 for adults and include access to both the mansion and grounds. 7 Bamboo Rd., New Orleans
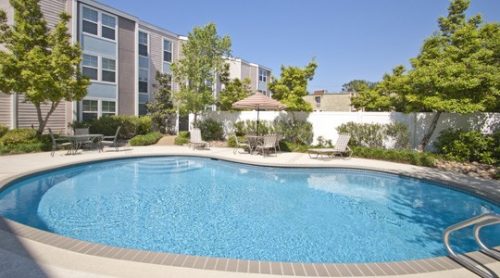
The pool at Bella Ridge, complete with in-water tanning ledges!
Bella Ridge Pool — OK, we’re a little biased here. But we spent so much time planning and perfecting the pool at Bella Ridge that we truly believe it’s an outdoor space worth adding to your list. Contact us today about how you can become a Bella Ridge resident and enjoy the pool all through the season! It features thoughtful details like tanning ledges and lush landscaping that transport you to luxury resorts, all right outside your door. 1101 Dickory Dr., River Ridge
Cleary Playground — Tucked away in a quiet part of Metairie, this small, clean playground features open fields and playtime equipment ideal for kids (or kids at heart). Picnic tables and shaded areas are perfect for adults — pack a snack and get going! 3700 Civic St., Metairie
KOA Campgrounds — If you’re really ready to immerse yourself in nature, you can visit the KOA Campground in River Ridge. It’s the official campground for New Orleans West and features campsites for both RVs and tent camping. No pets are allowed, so be sure to find a petsitter for your pup (and send them to these dog parks while you’re gone!). 11129 Jefferson Hwy., River Ridge
Want to take your pasta up a notch? Add depth of flavor to burgers? Take a break from basic butter on your toast? There’s a spread that does it all, and then some — and it’s so, so easy to make.
Pesto comes from the Italian word for “pounded,” and though it was originally made in a mortar and pestle (it’s still traditionally made this way in parts of Italy), today, you can whip it up ultra fast thanks to modern cooking appliances like blenders and food processors.
Read our Pesto Genovese recipe below, courtesy of Saveur, and keep scrolling for clever modifications that produce bold, rich flavors, plus tips and tricks for perfect pesto every time.
Ingredients:
Recipe:
Place basil, nuts, and garlic in a food processor blender and process until finely minced. Slowly add olive oil in a steady stream as the machine is running. Continue adding oil until the mixture is smooth. Then, add the cheese and process just long enough to combine.
Once you master a basic pesto recipe, there are infinite variations! Try different nuts, like pistachios or walnuts. You can also experiment with different oils, like avocado oil or coconut oil, or cheeses like pecorino. Even the herbs are up for experimenting! Skip the basil and try adding parsley, spinach, or kale. Just adhere to the basic recipe below for the ratio you’ll need of each ingredient:
Pesto is almost foolproof, but there are a few tips and tricks worth knowing:
Need more dinner ideas? Check out all of our cooking tips!
Do you find yourself practically playing a game of Tetris to fit all of your groceries into your refrigerator? Whether you have a smaller fridge or just more refrigerated items than you know what to do with, don’t stress.
There are ways to create more space to make room for everything that needs to be refrigerated. Start with these fridge organization hacks, and read on for the best places to store everything inside your refrigerator:
There are ways to create more space to make room for everything that needs to be refrigerated. Start with these fridge organization hacks, and read on for the best places to store everything inside your refrigerator.
This is a quick and easy fix for products that are taking up more room than necessary. Many products like rice or prepared food come sealed in a bag inside a large, bulky box. By eliminating the packaging, less space will be needed to store the item in the refrigerator.
Chances are, you have a lot of products that have been sitting in your refrigerator, neglected for a long period of time. Most likely these items include salad dressing and condiments, wilting produce, half-empty bottles of flat soda, frozen popsicles or prepared meals, just to name a few. Make a habit of routinely cleaning out your fridge to throw out the items that have expired or spoiled.
To keep the surfaces of your refrigerator clean, lay down some easily removable cling film on each shelf of your refrigerator to catch spills and crumbs, and remove them and replace as needed.
Smartly utilize your refrigerator space by separating different types of food in designated baskets, like condiments, greens, dairy, fruit and meat. Label the containers to keep to a consistent system going and for quick and easy access.
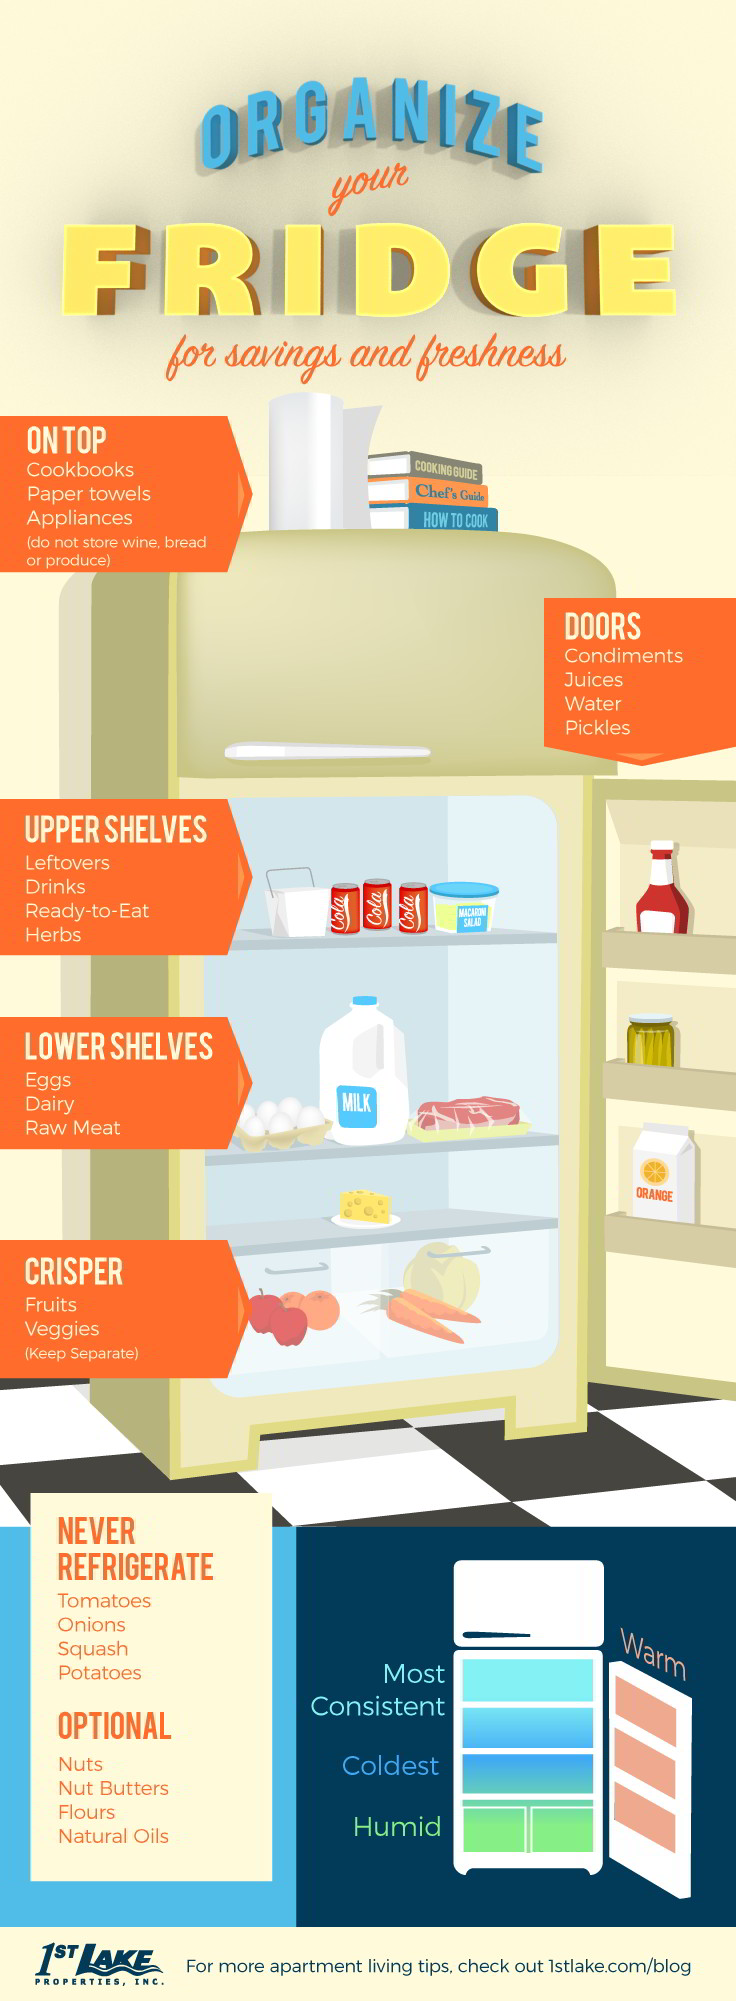
Did you know that there is a correct method for organizing your fridge and making the most out of your groceries? Follow these tips to maximize your food’s freshness and save money in the process!
Store things like cookbooks, paper towels and appliances on top of your fridge. NEVER store bread, wine or produce on top of your refrigerator.
The door is the warmest part of your fridge, so use it to store products that aren’t as sensitive to temperature, such as confinements and sauces, juice, pickles, sodas and bottled water.
The upper shelves of your fridge have a consistent cold temperature perfect for storing leftovers, drinks, ready-to-eat prepared foods and herbs.
The lower shelves of your refrigerator are the coldest part of your fridge, which makes them ideal for keeping your milk, eggs, dairy products and raw meat safe.
Your refrigerator has two crisper drawers for a reason. These are made for storing fruits and vegetables separately.
There are certain things you NEVER want to refrigerate, including tomatoes, onions, squash and potatoes.
Many items in your kitchen pantry can be stored in your fridge if you prefer, like nuts, peanut butter and almond butter, flour and natural oils. Some medications and beauty products are also best when refrigerated.
1st Lake Properties offers spacious kitchens with modern appliances at our many convenient New Orleans area apartments that will make refrigerator organization a breeze.
As a long-time New Orleans company, we’re always excited to share good news about the Greater New Orleans area. We already knew NOLA was a star, and now we have STARs (Statistics, Testimonials, Awards and Rankings) to prove it. Greater New Orleans Inc., an economic development organization, released its 2015 STARs data on New Orleans, and we’re so proud to live in a city that has accomplished so much.
The distinctions and statistics collected by GNO Inc. come from a variety of sources. Whether from print and online publications (including everything from Forbes to Thrillist) or from government agencies like the U.S. Chamber of Commerce, New Orleans has received praise across the board in areas like talent and workforce, entrepreneurship, quality of life, economic development, and more.
Here are just a few of the many stellar accolades bestowed upon New Orleans:
Visit GNO Inc.’s full list of STARs. Congrats, New Orleans!
1st Lake Properties | P. O. Box 73709 | Metairie, LA 70033 | info@1stlake.com
